
Idera recently acquired Sencha (https://www.sencha.com/) and has added the company products to the Embarcadero business unit, which produced RAD Studio and also the RAD Server web service technology. A natural question arises on how to use the two products together. While there are several options, in this blog post I want to highlight the simple and direct integration of RAD Server and FireDAC with an ExtJS client based on Sencha’s data model architecture. Most of the considerations in this blog post would equally apply to using WebBroker or DataSnap to build the web service..
A Simple Test
As first step, I’ve created a simple blank RAD Server application. What this does is to expose standard REST endpoints like “version”. In an ExtJS client build with the Architect IDE, I’ve added a button, picked the Tap event, and written code like the following:
   onButtonTap: function(button, e, eOpts) {
       Ext.Ajax.request({
           url: 'http://192.168.1.102::8080/version',
           cors: true,
           success: function(response, opts) {
               var obj = Ext.decode(response.responseText);
               console.dir(obj);
               button.setText (obj.server);
           },
       });
   }
What this code does is make a call to the version REST API, create a JavaScript object with the resulting JSON (decode), display the data on the browser console, and display the server field as button text.
Defining a Data Model
This just proves that the JavaScript application can invoke RAD Server. Next I moved to the data processing. ExtJS has the concept of a data model, so using the visual tool I created a simple one like the following:
Ext.define('MyEmployeeApp.model.EmployeeData', {
   extend: 'Ext.data.Model',
   requires: [
       'Ext.data.field.Field'
   ],
   fields: [
       {
           name: 'first_name'
       },
       {
           name: 'last_name'
       },
       {
           name: 'phone_ext'
       },
       {
           name: 'dept_no'
       },
       {
           name: 'job_country'
       }
   ]
});
Returning JSON from RAD Server
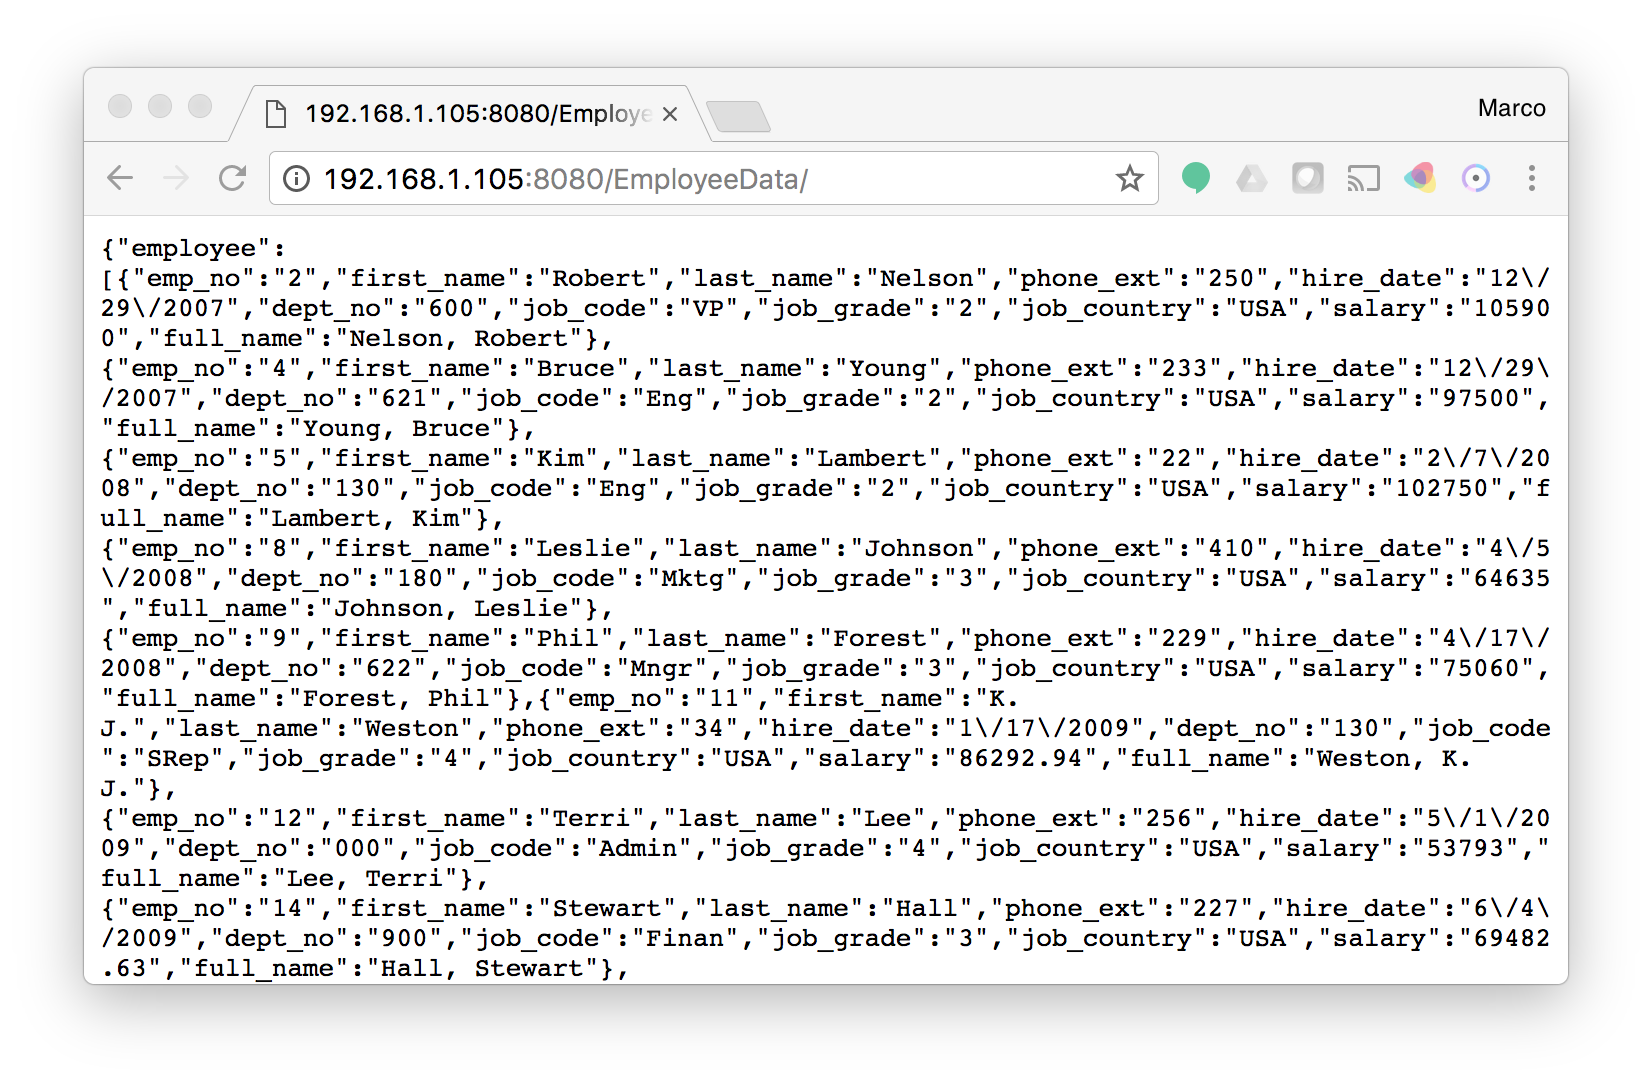
Next, I had to define a data store. First I used an AJAX data store and to keep things simple I wrote a custom method in RAD Server to expose a plain JSON data structure, built using the TJSONObject and TJSONArray classes. In this code EmployeeTable is a TFDQuery dropped in the data module along with a connection to the classic InterBase employee demo database:
procedure TEmployeeDataResource1.Get(const AContext: TEndpointContext;
  const ARequest: TEndpointRequest; const AResponse: TEndpointResponse);
var
  empDataObj: TJSONObject;
  data: TDataSet;
  emplArray: TJSONArray;
  emplObj: TJSONObject;
  aField: TField;
begin
  data := EmployeeTable;
  data.Open;
  empDataObj := TJSONObject.Create;
  emplArray := TJSONArray.Create;

  while (not data.EOF) do
  begin
    emplObj := TJSONObject.Create;
    for aField in data.Fields do
    begin
      emplObj.AddPair(LowerCase(aField.FieldName),
        aField.AsString);
    end;
    emplArray.Add(emplObj);
    data.Next;
  end;
  empDataObj.AddPair ('employee', emplArray);
  AResponse.Body.SetValue(empDataObj, True);
end;
This is the resulting JSON in a browser:
With this code and the use of an AJAX call, the JavaScript application by default ends up with with cross-server invocation security problems, when executed in the browser. There is however a fairly simple solution in RAD Server, which is set a single line in the EMS.INI file, with a configuration like:
[Server.APICrossDomain]
;# Write here the domains allowed to call the API. Used for Cross-Domains
CrossDomain=*
This is fairly over-permissive, in production you’d want to indicate a specific domain rather than *. With this setting and possibly even some proxy configuration in your web server, you can handle the cross-domain resource access.
Implementing JSONP in RAD Server
The alternative options (a little older and considered less secure) is to implement a JSONP server. You can read the documentation here: http://docs.sencha.com/extjs/6.5.2/modern/src/JsonP.js-1.html.
In short, rather than returning JSON data, a JSONP call returns the JavaScript source code of a function that includes the JSON text as a parameter. The name of the function to call is passed in a parameter named “callback” in a regular GET HTTP call. A common implementation is to check for that parameter and return JSONP (that is, JavaScript) in the specific case, JSON if the parameter is not present. It actually takes less time to read the code than the description. In the code above, the last line becomes:
var
  callBackParam: string;
  strStream: TStringStream;
begin
  ...
  // check for JSONP request
  if ARequest.Params.TryGetValue ('callback', callBackParam) then
  begin
    strStream := TStringStream.Create (
      callBackParam + '(' + empDataObj.ToString + ');');
    AResponse.Body.SetStream(strStream, 'text/javascript', True);
  end
  else
    AResponse.Body.SetValue(empDataObj, True);
end;
Defining Storage in ExtJS
Now that we have a proper source of either JSON or JSONP data (both work at the same URL), we can define a data storage for them in ExtJS. Again, using Architect this can be done by setting a few properties, and here is the resulting code for AJAX:
Ext.define('MyApp.store.MyJsonStore', {
   extend: 'Ext.data.Store',
   requires: [
       'MyApp.model.MyModel',
       'Ext.data.proxy.Ajax',
       'Ext.data.reader.Json'
   ],
   constructor: function(cfg) {
       var me = this;
       cfg = cfg || {};
       me.callParent([Ext.apply({
           storeId: 'MyJsonStore',
           autoLoad: true,
           model: 'MyApp.model.EmployeeData',
           proxy: {
               type: 'ajax',
               url: 'http://192.168.1.102:8080/EmployeeData/',
               reader: {
                   type: 'json',
                   rootProperty: 'employee'
               }
           }
       }, cfg)]);
   }
});
The rootProperty is the name of the core JSON object, under which there is the actual data. It could be a more complex and nested sequence. With this configuration, you can use the Architect IDE to load the data and preview it:
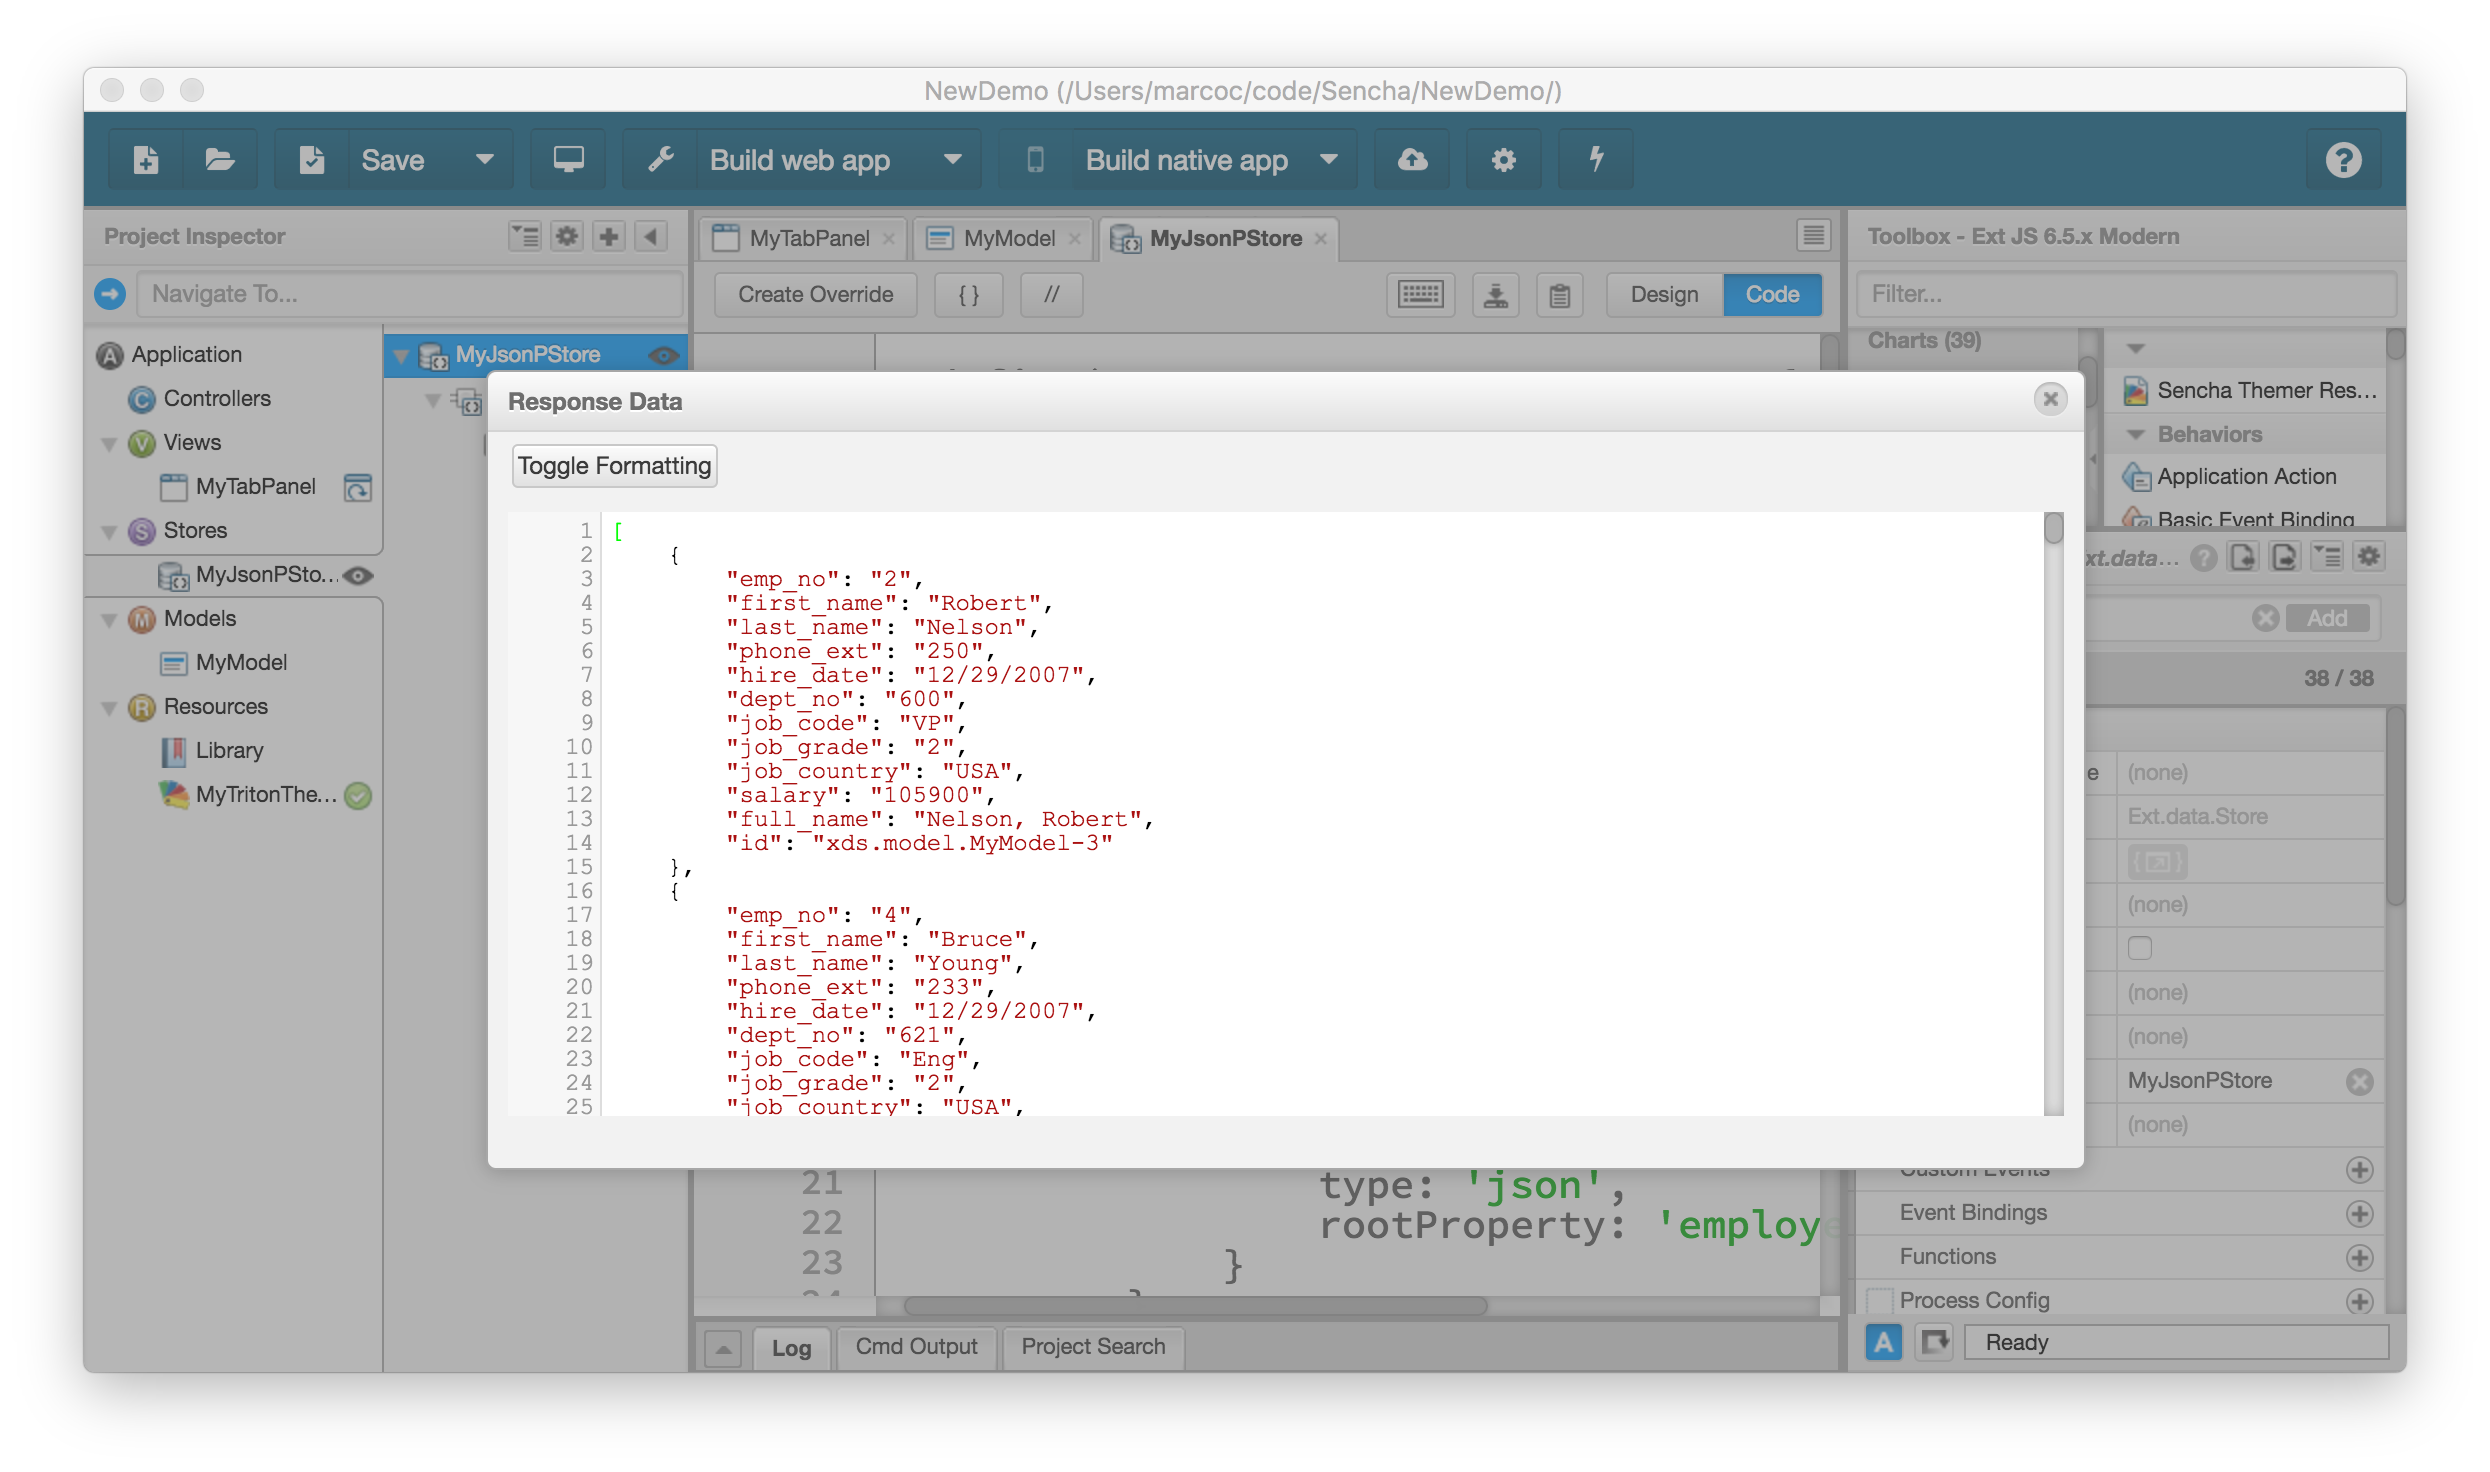
The configuration of a JSONP data store is very similar, as listed below:
Ext.define('MyEmployeeApp.store.MyJsonPStore', {
   extend: 'Ext.data.Store',
   requires: [
       'MyEmployeeApp.model.EmployeeData',
       'Ext.data.proxy.JsonP',
       'Ext.data.reader.Json'
   ],
   constructor: function(cfg) {
       var me = this;
       cfg = cfg || {};
       me.callParent([Ext.apply({
           storeId: 'MyJsonPStore',
           model: 'MyEmployeeApp.model.EmployeeData',
           proxy: {
               type: 'jsonp',
               url: 'http://192.168.1.102:8080/EmployeeData/',
               reader: {
                   type: 'json',
                   rootProperty: 'employee'
               }
           }
       }, cfg)]);
   }
});
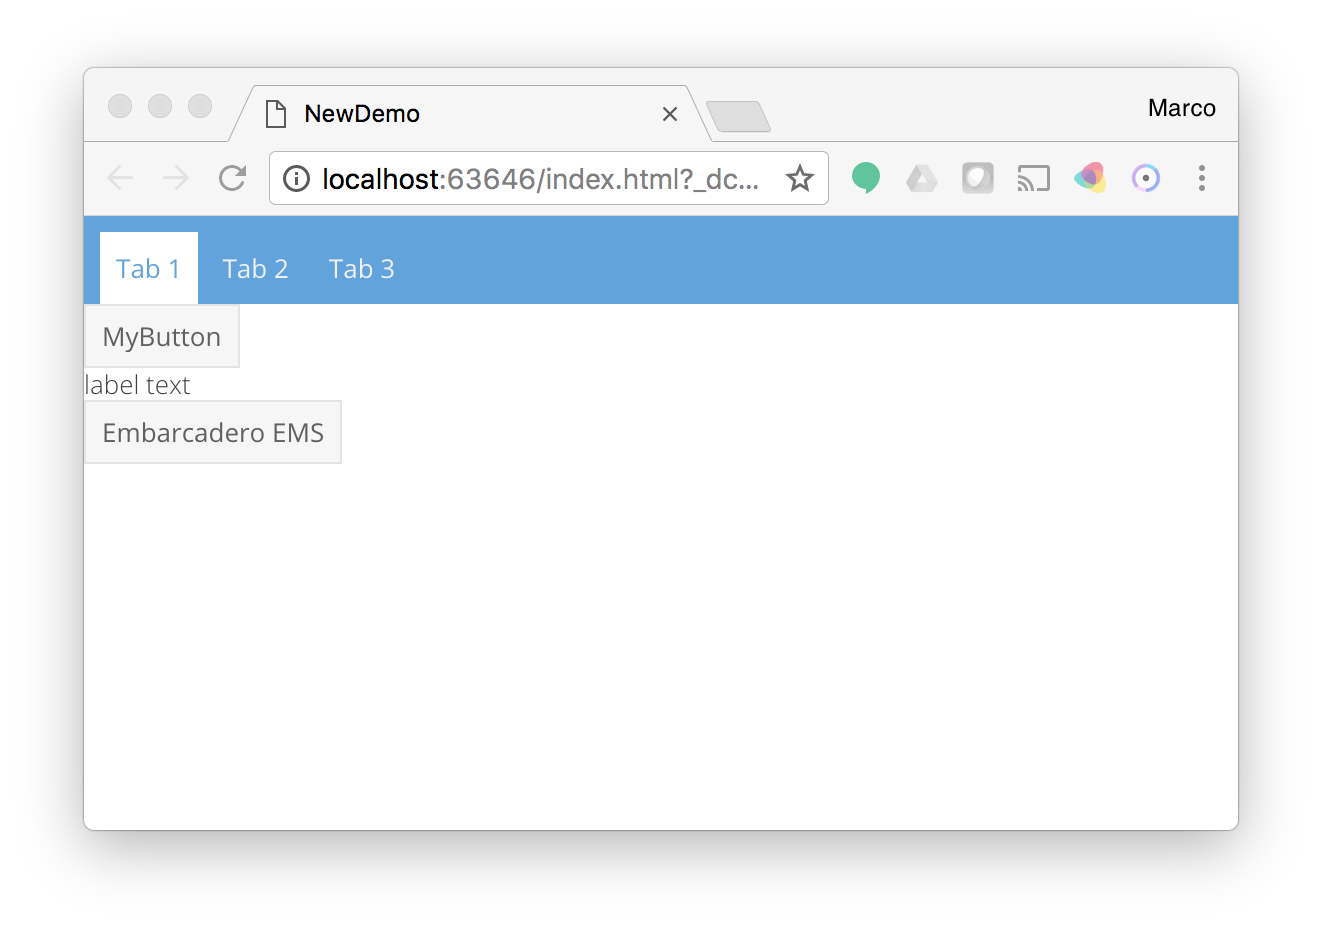
An EXtJS Grid for the UI
Now that we have a model and a data store (or actually two), we can wire up the user interface. For this simple case, I’ve just added a grid to the UI, added 5 columns to it, and tied each column to each field in the data model:
               {
                   xtype: 'grid',
                   height: '100%',
                   width: '100%',
                   store: 'MyJsonPStore',
                   columns: [
                       {
                           xtype: 'gridcolumn',
                           width: 70,
                           dataIndex: 'first_name',
                           text: 'First Name'
                       },
                       {
                           xtype: 'gridcolumn',
                           width: 80,
                           dataIndex: 'last_name',
                           text: 'Last Name'
                       },
                       {
                           xtype: 'gridcolumn',
                           width: 80,
                           dataIndex: 'phone_ext',
                           text: 'Phone'
                       }, ....
With this configuration, you can preview your grid at design time in the Architect IDE, as shown here:
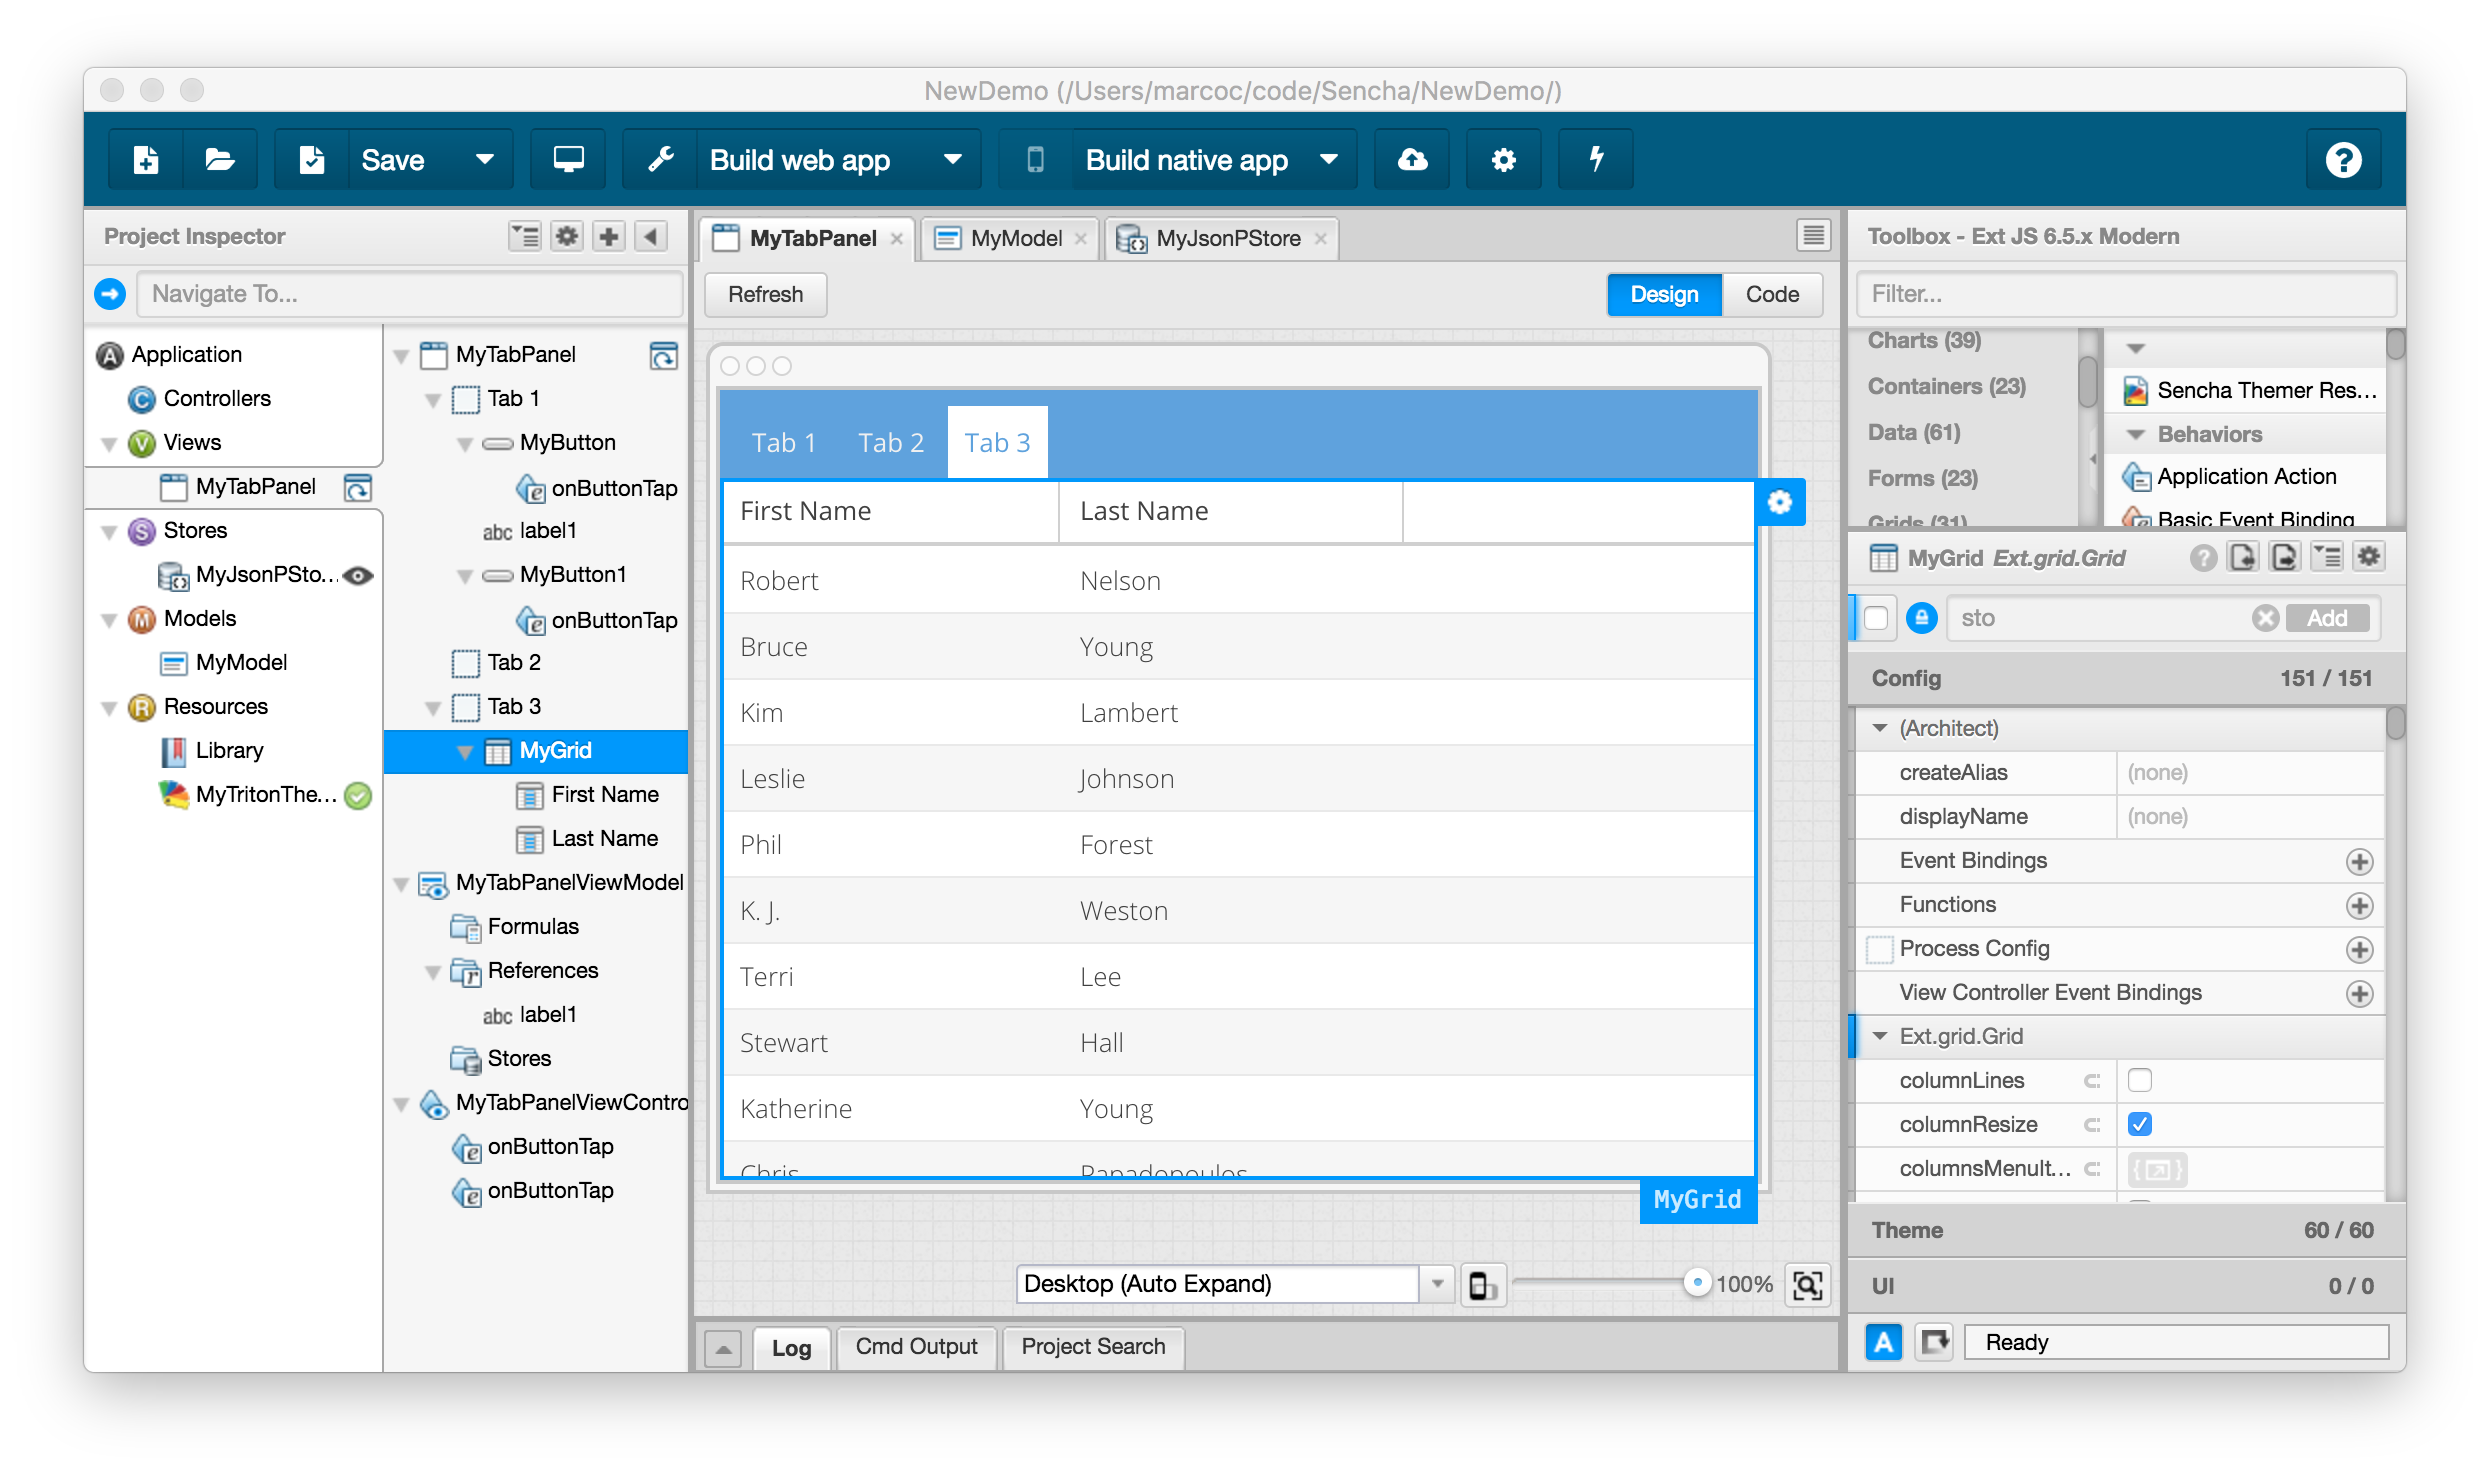
And finally, this is the final application running in a browser, with the ability to sort and rearrange the columns in a very sophisticated JavaScript grid in the browser, powered by the InterBase employee database and a RAD Server web service:
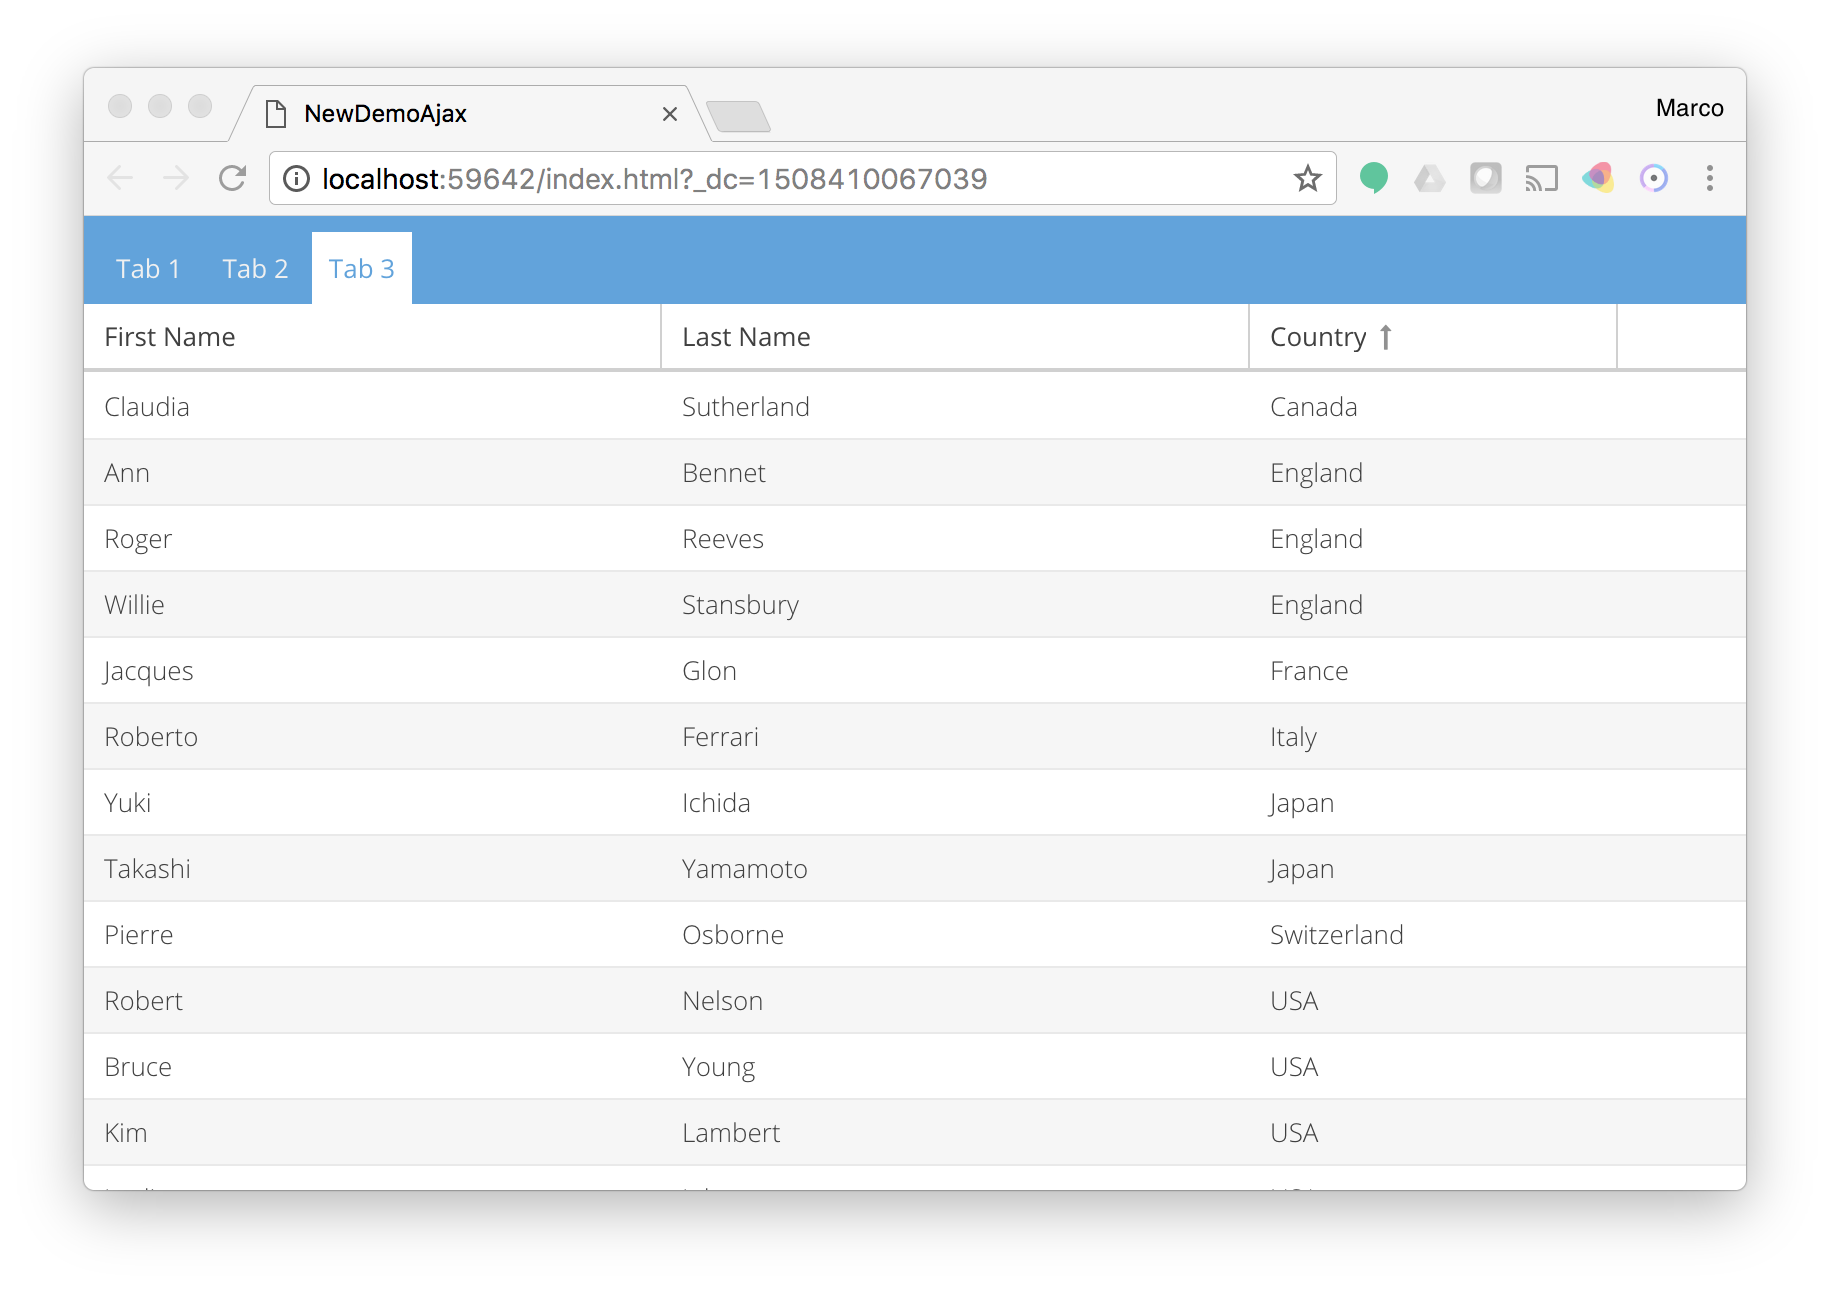
Summary
In summary the data flow is: InterBase database, FireDAC connection and SQL query, REST server method with custom JSON processing, ExtJS data storage, ExtJS grid for the UI. And something you can put together in 15 minutes!
While there are several different options on the table for using ExtJS and RAD Studio web services together, and more will be made available by Embarcadero in the future to further simplify the process, as you can see accessing to data produced by a Delphi application from an ExtJS client is reasonably simple.